Bring on the soup

For me, gardening has come as an extension of my love of cooking. Both are an expression of love for my family and they happen to partner very nicely. I often look to recipes for inspiration, but rarely follow them to the letter and so I nearly never make the same dish again. Life’s just too short for the same in my book.

But, when people ask me to share a recipe that never existed I tend to end up not sharing… And that’s just not nice. So, Lucas, here is my one-pot story for lentil soup:

I used to really love the thin yellow dal soups found in Indian restaurants, with tinny diced onions and cumin. I still enjoy them, but when I go to make a lentil soup these days it always takes on a thicker texture more akin to stew than a soup.
1small diced onion and caramelize it in olive oil with a carrot, celery and at least half a head of garlic, 
Once that has sweated down and the onions have gotten nice and brown add

1C green “French” lentils

1.5C split red lentils

5C chicken stock (I mix mine from a bouillon base)

2tbs tumeric powder, 

1 tsp cumin seeds/powder, 

1tbs paprika or chili

5 bay leaves

At least 4tbsp bacon grease

Simmer for at least an hour

You can adjust the thickness with water and I often use flax meal for thickening.

Taste for salt and add a few tablespoons of lemon juice just befor serving


This is some great soup and it plays well with others, garnish with cilantro, minty yogurt sauce, meatballs… I would show you a tasty picture but I’d have to double the recipe to have any for showing.


Warm and dry

Last year I was seduced by a Costco dehydrator priced at $40. What a score, it dried figs, tomatoes, herbs, and apples. And it did that while using electricity from our solar array. And it felt good until I thought about the waste of changing heat into electricity and back into heat. All that squandered energy lost in conversions. And we are tied to the grid, so in reality we used plenty of non solar energy at night. I don’t need any guilt from my food, so I looked up some passive dehydrator designs. And found the idea of a heat collector attached to a drying chamber. The heated air flows upwards while drawing new air from the base of the collector. Here is my prototype, with insect screens at the top and bottom of the collector. The drying chamber simply balances on top of the collector and the whole front of it opens. The box size also happens to be the same size as my trays from the costco special. So far all I have ready for drying is some herbs which have gotten nicely crispy and have stayed a lovely bright green. I do plan to stain it a darker color which will, I imagine, provide higher temperatures for the figs and tomatoes. 

The worm says “make it rain”

A few months ago I started with a pile of kitchen scraps leaves, cardboard and added a pile of worms. They are admirably keeping up with our kitchen and most yard scraps.

Along the way I’ve realized a few things. Like, it’s important to keep turning the materials so that the edges don’t dry out and compact. The worms won’t touch anything dry so this helps the worms make quick work of all the delicacies we throw at them.   
I set up my worm hive with a hardware cloth mesh on the bottom of each section thinking (as the inter webs promised) that the castings would fall through, which hasn’t exactly been the case, however it does make it very easy to extract worm tea by pouring water through the enclosure. The water pulls out lots of processed particulates and almost no worms. The worms seem to get excited when the water goes through and the kids love the wriggling beasties.  

I also have a new technique, that I think will speed up the process even more. Whenever I open up the hive, I find the worms are clustered in the center of the pile. So, I’ve taken to making that the location for the new materials I’m adding. After making a batch of tea, I dig a hole and then mound the older materials on top. Here’s a yummy picture of today’s efforts. 


My dearest wish

I suppose I might as well come clean about a secret in my life. This is my insatiable desire to live inside a Rube Goldberg contraption. I think the expanding nature of my aquaponics setup was even foreshadowed when I removed my lawn and sprinklers and replaced them with drip irrigation, and of course each garden bed had a different pattern, hey I haven’t even figured out how to make the garden beds a uniform shape!

I started many of my seedlings in January and February and they grew, but slowly. I also was saddled with the onerous chore of hunting through them to be sure every last baby had water. 

No more my friends. Today they are watered every 15 minutes or so. Today they have an endless supply of nutrients. In my back yard trickle down works. How you ask? I got some disposable baking trays and put them to use, putting the return line of the aquapnics into the top baking trays, which discharge into the lower ones, which let the thrice cleaned water back into the fish tank. The growth has been great, and I’ve already transferred several larger tomato and lettuce plants into the ground!

Here is the setup as I started the new watering protocol about a week ago:


Here it is this morning 


Looking forward to the next complication. 

A worthy coop

This project has been my baby over the past few weeks. Loosely based on this coop, I’ve been pecking away at and reworking the design as I go… I think it’s pretty nifty.

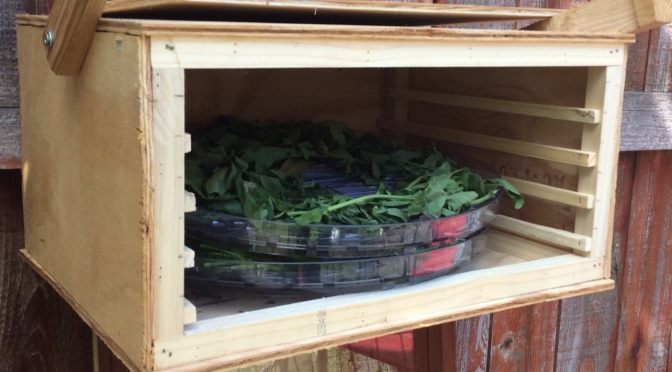
Inside each upper door will be a nesting box, something in a storage tote or cat litter container. Hopefully this makes it super simple to collect eggs.

Next is water and feed solutions, which can be accessed from outside…. These are my models for that:


Pretty sure drip irrigation will be involved.


I do hope to feed them as much on compost and yard scrapage as possible but I live in the suburbs so I’m sure I’ll need some modern type feed sometimes. Maybe I can work out something less plastic-y. Like a piece of down spout? 


Here is my Chicken coop pinterest board if you’re looking for some inspiration.

Less is more

I have struggled with my aquaponic setup getting the water to cycle continuously. 

My problem was most often that after cycling a few times the system would reach a point where the stock tank had drained and the beds had partially drained but not enough to engage the float switch which operates my pump to return the water for infinite loop bliss. I would then need to add a bit of water to get the pump on but it would often overfill the container and I would loose water. Not usually a lot but sometimes it was enough to stall the system yet again. Sometimes I added water a few times a day only to have the stock tank overfill. 

My work around has been a couple of 1/4 inch drip irrational lines that would syphon from deeper than the output hole was cut. Eventually they would draw enough water to trip the system back to life. But if you have to fill 30 something gallons of a sump tank via a 1/4 inch line,  it can take… hours, long enough for negative things to happen.  This is protection against all out stagnation. But at its heart, it really is a work around, not a solution.

Edit

Today I finally realized that what I needed to do was to lower the height of the float switch just a few inches. It is zip tied to the return pipe so I just had to twist it back and forth to get it to slide lower. Presto changego and the pump engages more frequently and for smaller amounts of water returning to the fish tank. The system has been chugging along happily all day and I’m reasonably sure that when I get home it will still be gurgling away. 

This picture kinda shows how my system is set up. Simple fixes are the best, though it took an embarrassingly long time to find this solution. It’s ok, I’ll put up my feet and listen to the bubbling water growing veg in what is becoming the northern California desert.


Doing something right

Honestly there is such a dizzying array of things that go wrong and spell death for your garden, it’s really a wonder that people ever made a full switch to argiculture. 

And on some rare occasions you can walk about your garden as king Midas must have (midasically?) sparking brilliant new life with every wafting finger.

Well that’s how I felt this morning as I noticed that nearly every single fruit tree graft was showing signs of flower budding and even threats of foliage. I was literally trying to leave the house for leisure (my kids are 2 and 4, you may understand what free time means) (also I say leisure, but I mean to go volunteer to pull weeds at the West County Seed Bank),  when I noticed the new buds and I had to run around the yard taking pictures… I hope those of you shoveling snow and trying to warm frozen pipes aren’t too jealous.

Anywho, this was my first foray into grafting, and I used all cleft grafts because that seemed the strongest connection. I know that it’s usually used for vertical branches but I figured that the rules don’t apply to me. On to the evidence of life:


And for those nameless doubters who thought hacking the impossibly tall and straight baby chocolate persimmon tree was the wrong call, here it is in all its stunning beauty:


And the buds are swelling, stretching the protective paint, ready to make new branches at just the right height.


Ok, not thoroughly impressive, but next year, when you see the shape of this tree, you will see it is tree shaped.

It’s a blueberry year

I’ve been thinking lately on guilds. No I’m not becoming a spice trader (gotta save something to do next year). I just want to apply as much permaculture to
my slice of heaven as I can muster. I’m basing much of my plans on permaculture diagrams like this one.


In the last month we’ve put in several fruit trees and so my thoughts are turning to the shrubs. With two insatiable berry monsters, and a newly found inexhaustible supply of coffee grounds, it makes a lot of sense to me to plant acid loving blueberries as the shrub layer. Since I am in USDA zone 8b/9 and Sunset 14, I’m choosing southern high bush varieties with very low chill requirements ( Misty and Jewel). I also picked up a pink blueberry plant last weekend, because I’m a sucker for a plant sale.


This one is growing so well in a shady spot under the pear tree. It was planted early last year and I hope to propogate some cuttings later this year off the new growth. I seem to have lost the tag, and it put out loads of berries for such a short plant… Oh well… At least I can grow exact copies.At this point there are ten blueberry plants in the yard, there’s still some spots for more, hopefully the propagation project will fill those up soon.

Now on to thinking about accumulator plants that can drill down into the clay here… Ideas? 

On loss and new beginnings

We recently took a detour through Harmony Farms, another of our Sonoma county treasures. They had fruit trees. Now we own all their fruit trees.

Three years ago we planted a neato multi grafted pear tree, which produced exactly 23 leaves in those years. So this was the year to call it. I dug it up, still barely alive and placed an ad on Craigslist for someone who wanted to rehab the poor pear reject. The ad was very clear that the pear tree was in the driveway in a plastic bag, bare roots.

In the front yard I had the last of our Harmony purchases, a tri peach-plum hybrid, in an enormous storage tote, soaking up chicken manure, planting dirt and fertilizer while I got around to removing a stump and placing this guy in the hole. Two days into digging and cutting out an established bottlebrush tree root system (don’t hate me, there’s another one in the back yard), someone took the whole potted peach tree. They walked the whole thing out from behind garden beds and left the scraggly pear tree in its flapping plastic bag at the curb.

Livid, and unable to properly express the rage while bity ears were in range, I stewed for a week. I posted a ranting plea for return from the marginally literate culprit. I retail therapy-ed away the pain with a plum/cherry cross that would work more thoroughly with the flanking pluots. I poured my energy into starting veg and herb seeds, and in time, the hurt faded.

But yesterday while I puttering in the front yard veggie patch a dude stopped and asked if he had taken the wrong tree! And a few hours later he brought back the whole thing, container and fertilizer included! It weighed a hundred extra pounds because of the recent bountiful rains, but I’m very pleased to announce that additional fruit tree #22 has been installed.

For those keeping count that’s:

2 multi apples
Multi pear
Santa Rosa plum
2 apricot
3 peaches
Nectarine
Cherry
Chocolate persimmon
Tangerine
Blood orange
Orange
Lemon
Grapefruit
Calamondin
2 pluot
Pluerry
And now one happy tri peach plum mix…

I hope it survives.

Now, what should I graft onto it so we finally get a little variety around here?

Sprouted

I got home last night around midnight and the temperature was a balmy 50 degrees Fahrenheit. And the sprouts appreciate it very much.

Tulips are just poking through the ground here, as is the asparagus. Tomatoes (mortgage lifter, German orange strawberry, romanesco, brandywine) have eagerly sprung forth and been individually potted. Okra, cucumbers, a few peppers, broccoli, fennel, lettuce, spinach, yarrow, and beans have made an appearance.

Some new-to-me varieties have yet to sprout like romanesco broccoli, and celeriac… But I expect them to show in few days.

The direct sown radishes, carrots, and turnips are off to a good start, though some seem to be slow. The aquaponic lettuce keeps on giving, we’ve eaten fresh salad most days this week.

I finally found out why Burpee listed mid February as the last frost date. They like to sell plants and give the 50% last frost date… Knocking on wood, I
feel pretty good about our chances, and scared for the babies.

IMG_0320

Growing and gardening, making a sustainable life